
Le Tigre Bath Remodel, ORC - Week 4: The Jib Door

If you’re new around here, thanks for stopping by and welcome! I am Lauren Caron, an interior designer and the founder of Studio Laloc, an interior design firm based in Seattle, Washington. On the side my husband and I are remodeling our home that I’ve given its own hashtag #ourseattlecraftsman. We’ve renovated our kitchen, scullery and now we’re on to the Powder Room. This is my first foray in participating in the One Room Challenge partnering with Better Homes & Gardens, and I’m really excited to be a guest participant. I hope you stick around and follow along as we make our 70s bathroom into a modern day jewel box! If you missed last week’s post please check out it via the link below!
WEEK 3 POST
This week marks the halfway point of the ORC and we are NOT halfway through our progress sadly! Let’s quickly recap what we have accomplished and what else we have left to do, then I’d like to take a deep dive into the jib door and the additional tasks that we’ve added to our to-do list, because of it.

First of all, we managed to finish installing the trim throughout the entire room. It looks so much better already. Jack finished mudding and sanding the drywall seams, while I filled all the nail holes, sanded and primed the entire room. Side note: I had the paint store tint our primer with black to make it darker, which in turn will help with coverage for dark paint. I finalized the paint selection (Inchyra Blue by Farrow & Ball it is) and ordered the paint, finalized my stone selection - keeping that a bit of a secret until closer to the reveal. And I think I’ve finalized my fabric selection, but have not ordered it yet.
A Little Good News!
I’m very excited to share that Farrow & Ball is gifting us the paint for this room! Kind of humorous because the day that I was planning to place the order, the rep reached out and offered to help support us in this project. They have offered to send primer as well, though I had already primed the room. I think I’ll probably run another coat of F&B primer over my other primer where I’ll be painting, just to see how important it is to use the entire Farrow & Ball system. In the past I haven’t use their primer, so I can definitely use this as an experiment to see how important it is to use their primer vs not.
Left on the punch list aside from the tasks the jib door has given us, are to tile, grout, install the remaining trim, paint, wallpaper, build out the drawings and remove the top of the vanity chest, install the fixtures (lighting, vanity, toilet, medicine cabinet, faucet, and hardware), install the drapery and finishing touches of artwork and decor.
The Hidden Door
Circling back to our progress I want to discuss the hidden door we’re planning to install in the mudroom, which is the door that leads to the powder. This past weekend we worked on the jib door, that is the proper term for a hidden door. This door by the way is causing a lot of headaches for us, and is making the process so much more challenging than it should be. In order to make a successful jib door these are the main components needed.
Hidden hinges - easy
A Level Floor between both rooms - hmmm, that is where our major problems lie
Moldings and trim to further make the door look more hidden - we got that
A flat door without a door knob hole - we did not have that, and needed to source a new door
A wall that is smooth and will allow for the door to be flush to it - we originally did not have that either, which called for the next course of action
A way to open and close the door that is also invisible or not extremely visible - Jack has that figured out with a ball latch
In order to explain how and why the jib door is more complicated than a normal hinged door, we need to go into a little history about the house. When the house was originally built in 1916, it was built with a back covered porch. The powder room and the scullery were originally the location of the covered. That means these rooms were exterior rooms. When the powder was converted into a bathroom in the 70s, a door frame was cut from the sunroom to access the powder leaving a height discrepancy between the two floors in the adjoining rooms. The powder in general is not level since it used to be a porch, and it’s very common that porches have a slope to help any rain runoff away from the house. As of now though, the powder is lower than the sun room. To have a successful transition between the two rooms you need to do one of two things.
One option would be to not worry too much about the discrepancy and put a threshold within the door frame. This option was our initial plan, because the threshold would marry the two rooms and connect the uneven floors without much additional thought. It’s not ideal, but it’s common in old houses. The second option is to build the powder room floor up to the height of the sunroom, in order to be certain both floors are flush with each other. Instead of a traditional threshold, the tiles would meet at the center point of the door frame or there would be flush threshold that would create a more seamless transition. This option was not what were planning to do, but after thinking about the concept of the jib door, I realized seeing a standard threshold would give away the ‘hidden’ factor of it. So that means, that we will need to take the direction of option 2. We will have to build the height of the powder room floor up to the future height of the sunroom. Not too much of an issue, except that I have not selected the tiles for the mudroom yet. This causes a bit of an issue, because tile thicknesses vary by material and if we don’t have a finalized tile, we actually won’t know the exact thickness we need to increase the floor to. I decided over the weekend I needed to get cracking on figuring out a floor design for this room ASAP. But, another problem is the tiles I’m leaning towards are showing two different thicknesses online and the samples are not coming for at least a week. Due to time constraints we don’t have a week to wait, so the only thing we can do right now, is build the floor to the highest common denominator of my tile options. YIKES. And if you’re asking if we can lower the floor in the mudroom, the answer is no. Well technically yes, but no we will not. That subfloor we discovered is concrete! And I DO NOT want to be tearing apart concrete.

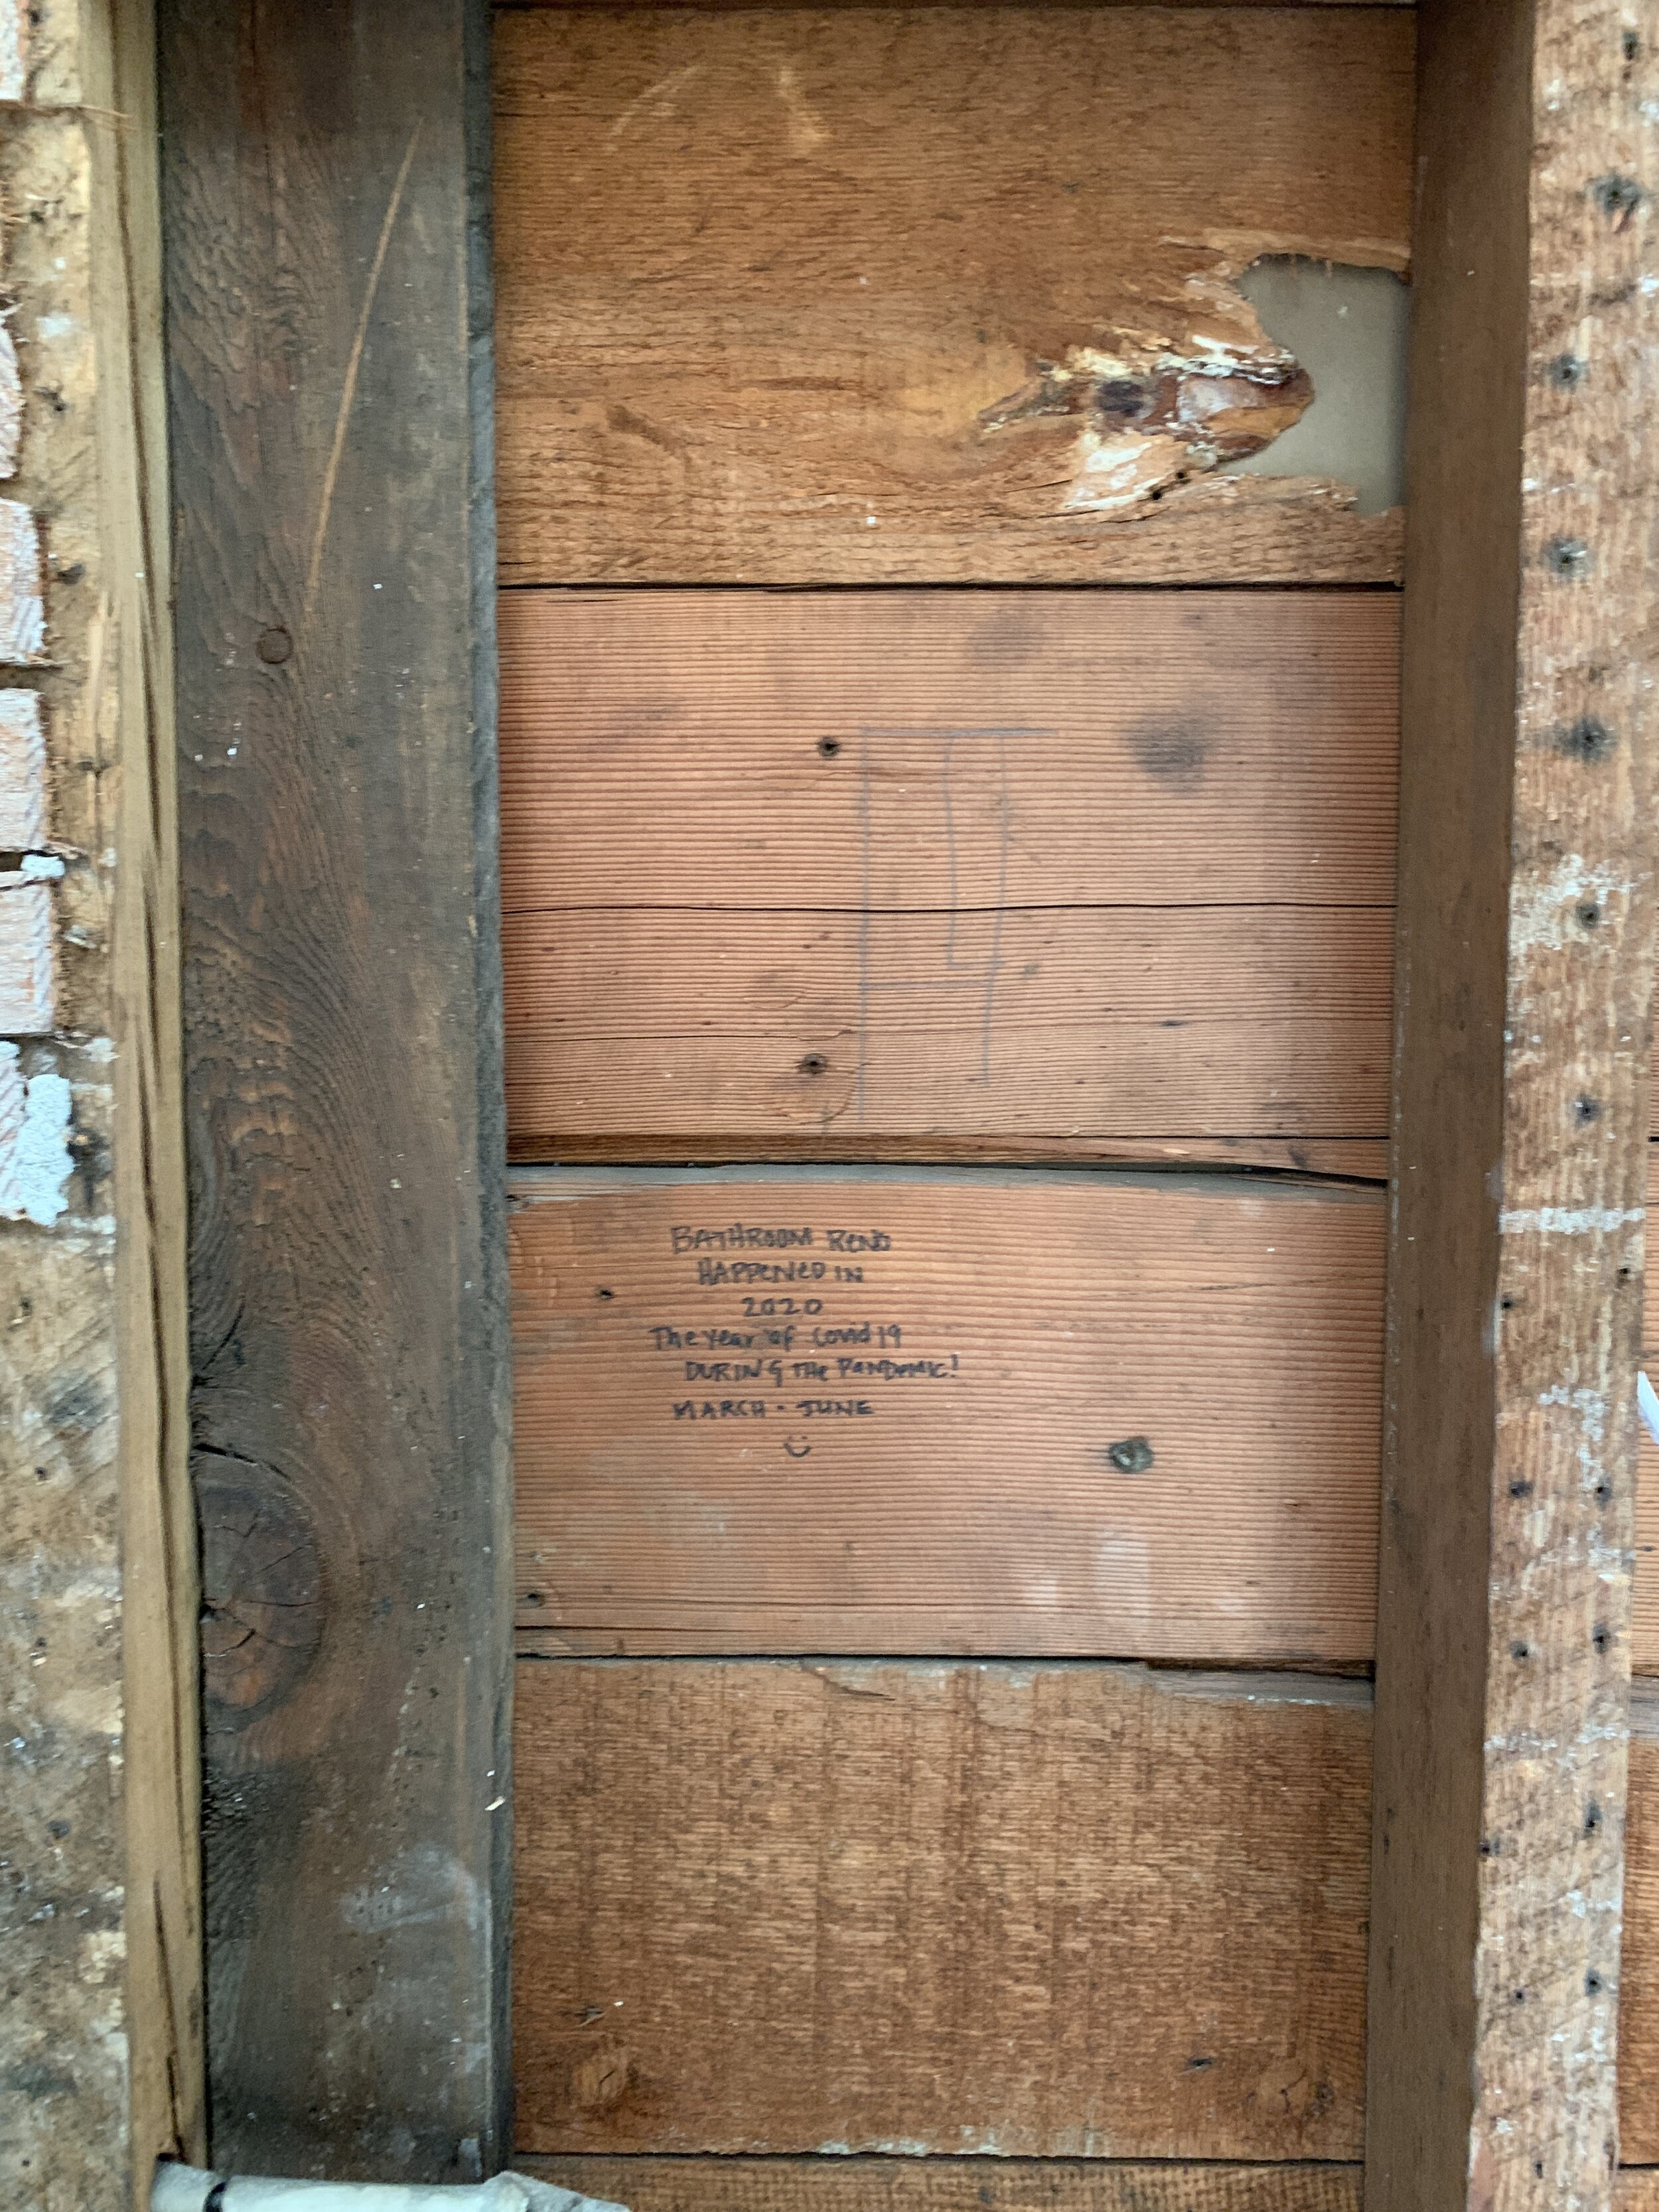
Part way through removing the plaster wall


Another reason why the jib door is making our lives more complicated is that the wall that the door originally was hung on in the sun room was comprised of plaster. All of the plaster surrounding the door frame was damaged when the door was cut in the 70s. One solution for us would have been to hire a plaster specialist to come in and repair the damaged plaster. But we decided that would be a lot of money for very little gain. So Jack decided removing the plaster on that wall would be the path of least resistance. Which proved to be the right move. We removed the plaster from that wall within a few hours and now he can add insulation in the wall, where there wasn’t before. And add new drywall which will then be set flush to the door we’ll be installing. One thing to note, we added a little note in the wall for future renovators to discover!

Next point of the jib door making things more difficult. We had to source a new door. Ideally, we need a door that is completely flat on the side facing the mudroom. We found a completely flat door at Home Depot, that I don’t love since it’s hollow, but we decided that we can replace this door when we have the finances to with a solid version of it. From the sunroom side, it’s going to be completely flush with the wall and be on it’s way to looking invisible! From the powder room side, it’s going to look like a sad cheap Home Depot door. So I decided I could work my painting skills and create a trompe l’oeil paneled door. However, after a sudden turn of events, my husband decided he didn’t like the flat door either. We now are going to seek out a used paneled door and add a 1/4” layer of material to make the mudroom side completely flat and smooth, leaving the inside the original paneling detailing. I want something to match what we have in the rest of the house (pictured below). And with a quick search through the Second Use website, I think I may have found exactly what we need!

Okay, so I believe that’s the full recap on the jib door. Now on to what we need to do next to stay on task for this room. The most important next step for progress in this room entails having the tile completed. After meeting with two tile installers we settled on one that has started today, as I’m typing this (yay!). He is planning to finish next week. So Fingers crossed we make it in time to have the stone fabricator come out, measure and turn around the slabs in time for us install the fixtures and finish all the other tasks!
I imagine I’ll get my paint within in the next week and I can get that completed in a day or two. Preferably I’d like to have the paint completed before the tile, but realistically I don’t think that’ll happen. So I’ll have to lay down a protective coating to ensure I don’t get paint on the tile. Then I’ll have to give myself a day to install the wallpaper, and a day for Jack to install the fixtures. And then it’s all the little elements, like accessories and hardware.
THE TO DO LIST
Demo Bathroom - Complete
Remove Pebble Dash from Walls - Complete
Reset plumbing to accommodate new fixtures and design - Complete
shift toilet waste pipe over 3” - Complete
Set electrical placement of overhead light fixture, wall sconce, plugs and switches - Complete
Remove existing window and swap with new - Complete
Create inset for medicine cabinet - Complete
Install insulation - Complete
Sheet rock walls and ceilings - Complete
Mount tongue and groove beadboard paneling - Complete
Set trim around window - Complete
Mud seams and smooth coat over sheetrock - Complete
Fill nail holes in beadboard - Complete
Prime walls & ceiling - Complete
Order door
Order paint - Complete
Finalize window treatments & order fabric
Install floor tiles - In progress
Install door - In progress
Install baseboards and trim
Paint paneling, trim & ceiling
Install medicine cabinet
Wallpaper above paneling
Modify vanity cabinet drawers to accommodate sink & plumbing
Install plumbing fixtures
Install countertop and backsplash
Install hardware fixtures - toilet paper holders, towel holders, etc.
Photograph room
If you have been paying close attention, as of last week we’ve only checked off 2 items from the master to do list this week. Yikes.
Remember to check out the other One Room Challenge Participants and to follow along on Instagram! And to check out Better Homes & Gardens who has partnered up with ORC as this year’s media sponsor.


